|
Home
>
Main Forum
>
Topic See above. NAPA sells syringe fittings for grease guns. Clean the boot first.... |  |

Expect the best, and accept no substitute. |

Products for your Boxster, Cayman and Carrera. |
 | |
| Suspension creak fix? boxsterd - Wednesday, 6 March, 2013, at 2:12:01 am |
I have the exact creaking sound in this video, except I have to sit on rear driver's side fender to produce the creaking. At the 37 second mark, it says you can get rid of the squeak by putting a tiny hole in the control arm boot and squirting in some WD-40. What do people think? Good idea?
[www.youtube.com]
[www.youtube.com]

Laz - Wednesday, 6 March, 2013, at 11:18:43 am |
| Re: Maybe. But I'd say you need a new control arm. boxsterd - Thursday, 14 March, 2013, at 1:34:27 am |
| Re: Maybe. But I'd say you need a new control arm. Pedro (Odessa, FL) - Thursday, 14 March, 2013, at 7:30:25 am |
You can replace just one but more often than not when one fails the other is not far behind.
Happy Boxstering
Pedro
Pedro Bonilla
1998 Boxster 986 - 311,000+ miles: [www.PedrosGarage.com]
PCA National Club Racing Scrutineer - PCA National HPDE Instructor - PCA Technical Committee (Boxster/Cayman)
Racecar spelled backwards is Racecar
"Racing is life. Anything before or after is just waiting" ... Steve McQueen as Michael Delaney in "LeMans"
"If you wait, all that happens is that you get older"... Mario Andretti
"Being second is to be the first of the ones who lose" ... Ayrton Senna
Boxsterra - Monday, 18 March, 2013, at 9:18:47 am |
Laz - Monday, 18 March, 2013, at 7:09:37 pm |
| On audis with integrated ball joints on the control arms, i do this all the time. However.. grant - Wednesday, 6 March, 2013, at 3:23:11 pm |
WD40 is an awful, terrible, idea. Not only is it a crappy lubricant, but it dissolves what grease is there.Squirt in new grease with a grease gun and a greas syringe (available at any auto parts store). Then seal with silicone or rtv.
The creak is often a dry bushing (ball joint). If you catch it early you can extend the life for years. Too late and the damage is done.
Grant
Grant
gee-lenahan-at-gee-mail-dot-com
The creak is often a dry bushing (ball joint). If you catch it early you can extend the life for years. Too late and the damage is done.
Grant
Grant
gee-lenahan-at-gee-mail-dot-com
| Re: Suspension creak fix? San Rensho - Wednesday, 6 March, 2013, at 9:49:44 pm |
Laz - Wednesday, 6 March, 2013, at 10:32:23 pm |
| Yes, weeks. Abotu 156 of them on my Audi. Which takes us back to... grant - Thursday, 7 March, 2013, at 12:13:01 pm |
Wd 40 is nto a lubricant, and certainly, not a grease.
use good moly based grease and inject a lot. Seal well. Continue.
maybe this part is different, but i'd bet not much.
Grant
Grant
gee-lenahan-at-gee-mail-dot-com
Edited 1 time(s). Last edit at 03/07/2013 12:14PM by grant. (view changes)
use good moly based grease and inject a lot. Seal well. Continue.
maybe this part is different, but i'd bet not much.
Grant
Grant
gee-lenahan-at-gee-mail-dot-com
Edited 1 time(s). Last edit at 03/07/2013 12:14PM by grant. (view changes)
Laz - Thursday, 7 March, 2013, at 12:42:09 pm |
| I'm rather embarrassed to say... Jayusa123 - Wednesday, 20 March, 2013, at 2:05:20 am |
I had this exact squeak and fixed it by filling the ball joint with white lithium grease (from an aerosol can with a plastic straw.) I bought a new control arm a while later, knowing that it did need fixing eventually.
I've been storing that control arm for YEARS. It just never started squeaking again! It's something I've been meaning to install, but with the noise gone, I've easily put it on the back burner. No joke... it's literally been 3 - 4 years.
HA!
I've been storing that control arm for YEARS. It just never started squeaking again! It's something I've been meaning to install, but with the noise gone, I've easily put it on the back burner. No joke... it's literally been 3 - 4 years.
HA!
| Long live the grease fitting! (the grease fitting is dead :-)) *NM* grant - Wednesday, 20 March, 2013, at 12:12:02 pm |
Sadly. Although the "knife the boot and shove the straw in" method has worked well for me!  *NM* *NM* Jayusa123 - Wednesday, 20 March, 2013, at 2:02:33 pm |
| See above. NAPA sells syringe fittings for grease guns. Clean the boot first.... grant - Wednesday, 20 March, 2013, at 7:08:19 pm |
That's a nicer option than the aerosol grease. That stuff is always so airy.  *NM* *NM* Jayusa123 - Thursday, 21 March, 2013, at 2:16:57 am |
| Re: I'm rather embarrassed to say... boxsterd - Friday, 22 March, 2013, at 1:36:04 am |
| I will take a pic tomorrow when my wheels are off anyway. but its simple to find.... grant - Saturday, 23 March, 2013, at 9:36:39 am |
..the ball joint connects a control arm to the hub/upright. It is a round (ball), covered with a rubber boot, with a plate or a stalk coming out of it that attaches to the other component. Here's a pic , its the thing on the right, sticking up:
[www.vertexauto.com]
(front, lower control arm)
Grant
Grant
gee-lenahan-at-gee-mail-dot-com
[www.vertexauto.com]
(front, lower control arm)
Grant
Grant
gee-lenahan-at-gee-mail-dot-com
| Re: I will take a pic tomorrow when my wheels are off anyway. but its simple to find.... boxsterd - Tuesday, 2 April, 2013, at 1:47:14 am |
| I'm sorry, but in all the commotion (7 porsches in or near the driveway lat Sunday) grant - Tuesday, 2 April, 2013, at 9:37:43 pm |
I neglected your picture. I thought i'd have time but i was helping several people who were new to various tasks get stuff done before our pre-tech for Lime Rock.
But assuming that you can identify the control arm and the ball joint, you get a grease gun, a syringe tip for it (from NAPA), and yes, you:
1. clean the boot well - its much harder once you puncture it. This is so you have a clean surface to re-seal
2. pierce the boot and inject grease ( i used synthetic moly CV style grease)
3. then get a dab of silicone sealant or similar and seal the hole
It may take a little while for the grease to work its way into the ball and socket. Don't be surprised if it continues to squeak or groan for a little while.
Grant
Grant
gee-lenahan-at-gee-mail-dot-com
| I did this today Chris in Va Beach - Sunday, 21 April, 2013, at 8:19:03 pm |
And THEN...I see this thread.
I had a similar rear creak about 8 years ago. I put some ?moly? Lithium? (Don't remember) in the control arm ball joint and, well, its been 8 years. Recently the front passenger side has developed the same creak, so today I did exactly what I did then (and what is suggested above) - injected some lithium grease into the ball joint. Last time I didn't seal it back, this time I tried to with clear silicone. Did it work? Time will tell, but it passed the 3 speed bump test.
I had a similar rear creak about 8 years ago. I put some ?moly? Lithium? (Don't remember) in the control arm ball joint and, well, its been 8 years. Recently the front passenger side has developed the same creak, so today I did exactly what I did then (and what is suggested above) - injected some lithium grease into the ball joint. Last time I didn't seal it back, this time I tried to with clear silicone. Did it work? Time will tell, but it passed the 3 speed bump test.
| Re: I did this today boxsterd - Wednesday, 24 April, 2013, at 1:57:26 am |
Hi,
A few questions...
1) would it be possible for you post a pic of the control arm in your car so I can see what I'm looking for? I want to be sure I puncture the correct boot.
2) What did you use to puncture the boot?
3) Do you think this CRC White Lithium Grease would work well?
[shop.advanceautoparts.com]
4) Finally, is this putting a band-aid on the real problem (worn control arm) that should really be fixed with a new control arm otherwise I run the risk of suspension failure resulting in very expensive repairs? I mean I would rather spend $500, or whatever it costs to replace a control arm, than $5,000 down the road.
Thanks.
| I posted a pic of the control arm with ball joint above. grant - Wednesday, 24 April, 2013, at 11:38:08 am |
White lithium grease might be ok, but it would not be my first choice. I'd get a moly based axle or bearing grease, and a syringe fittment to attach to your grease gun.
If the joint is early an only creaking, it is not a band aid. It will prevent it from deteriorating.
have you read the many posts along this thread? Pretty well covered in sum.
Grant
Grant
gee-lenahan-at-gee-mail-dot-com
If the joint is early an only creaking, it is not a band aid. It will prevent it from deteriorating.
have you read the many posts along this thread? Pretty well covered in sum.
Grant
Grant
gee-lenahan-at-gee-mail-dot-com
| Re: I posted a pic of the control arm with ball joint above. boxsterd - Thursday, 25 April, 2013, at 1:43:27 am |
I was asking for a pic of the control arm as it's installed on the car. Maybe I'm blind, but I looked under the car and I couldn't find it.I would also like to know what people used to puncture the boot. That hasn't been discussed before. Don't take it personally if I ask another person after they post about their opinion. It's not that I don't trust you, I just like to get other peoples' opinions, do research on the internet, and then decide what to do or use.
| Location and puncture grant - Thursday, 25 April, 2013, at 10:30:10 am |
I think i have suggested, several times, to go to NAPA and get the syringe attachment for a grease gun. That pnctures the boot.
If i get under again, i'll take a pic, btu its really hard to miss the control arm. The ball joint end itself connects to the hub from below., and behind the hub, but that's obvious (it cant very well go through the hubm, can it?)
If i get a nother opporutnity i will take the pic in place.
Grant
Grant
gee-lenahan-at-gee-mail-dot-com
| Here's a picture... Pedro (Odessa, FL) - Thursday, 25 April, 2013, at 2:46:54 pm |
... of the control arm.
[i83.photobucket.com]
You can see the black rubber dust cover on the end at the left of the photo.
The joint is what holds the wheel carrier in place, from underneath.
Happy Boxstering,
Pedro
Pedro Bonilla
1998 Boxster 986 - 311,000+ miles: [www.PedrosGarage.com]
PCA National Club Racing Scrutineer - PCA National HPDE Instructor - PCA Technical Committee (Boxster/Cayman)
Racecar spelled backwards is Racecar
"Racing is life. Anything before or after is just waiting" ... Steve McQueen as Michael Delaney in "LeMans"
"If you wait, all that happens is that you get older"... Mario Andretti
"Being second is to be the first of the ones who lose" ... Ayrton Senna
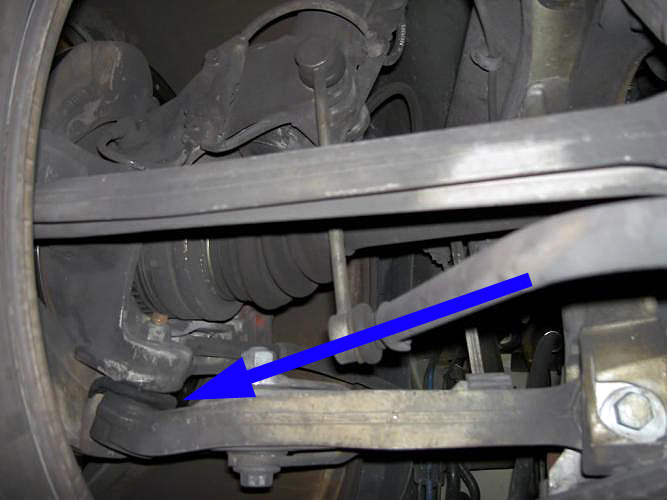
| And here's another.... grant - Thursday, 25 April, 2013, at 9:55:47 pm |
taken at the rear, but the rears and fronts are very similar (identical control arm i am told).
I pulled it back a bit to give some perspective.
At the very lower right (follow the sway bar end to the right, next you see the trailing link bolting to the control arm, keep going right, you see the hub with a nut coming out of it. That nut holds the stem of the ball joint into the hub. The ball joint is between the hub and the control arm (duh).
That nut is the one that i just posted about not being able to counter-hold, since the shaft points directly at the CV joint!
I would expect that with the wheel off you can get access to it from outside-front or outside rear. Getting the car up (or you down) is likely helpful.
[i41.tinypic.com]
Grant
gee-lenahan-at-gee-mail-dot-com
| Re: And here's another.... boxsterd - Thursday, 25 April, 2013, at 11:31:47 pm |

| No, but close. Just to the right of that. You can only see the nut. grant - Friday, 26 April, 2013, at 8:40:35 am |
You have circled the connection from the trailng arm to the middle of the control arm (ok, 4/5 of the way to the right, not really the middle).
The control arm bolts to the bottom of the HUB. The hub carries the wheel bearing and calipers. Since it bolts from the bottom, it is hidden in this picture. form other angles it is more clear. Look at the engineering diagram (or was it a photo of the part?) i posted above. You can see both and get a much better idea. That's why i thought it was in many ways a better reference than the jungle that is the car.
Grant
Grant
gee-lenahan-at-gee-mail-dot-com
| The arrow may help clarify... RainyDayGarage - Friday, 26 April, 2013, at 10:23:55 am |
Hopefully the arrows will make it clearer.
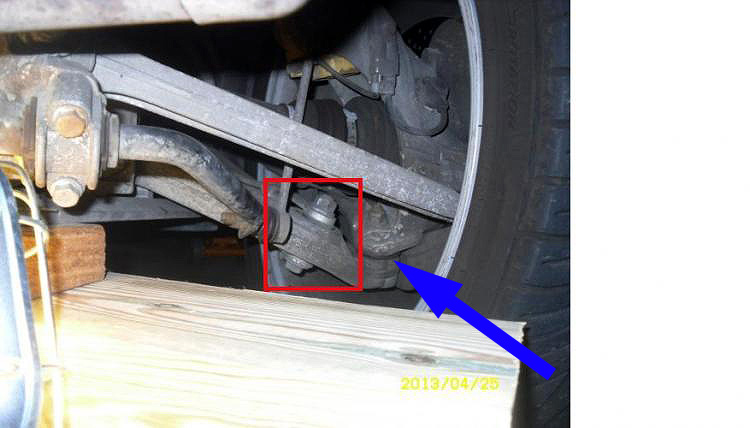

We had the same problem after this last Boston Winter...it was loud enough to be annoying even with the top down!
Followed the suggestions in this thread and eliminated the squeak yesterday after the dealer's alignment work.
The problem was only with the driver side front.
The squeak has completely disappeared and the 12-year old car is completely quiet again...at least with regards to the control arm :-)
Edited 1 time(s). Last edit at 04/26/2013 10:29AM by RainyDayGarage. (view changes)
| Nice arrow. Pedro's pic is actually much better to illustrate that.... *NM* grant - Friday, 26 April, 2013, at 2:33:48 pm |
| Re: The arrow may help clarify... boxsterd - Saturday, 27 April, 2013, at 2:19:41 am |
I think I'm finally getting it...  So in the last pic with the blue arrow, is that arrow pointing to the rubber boot that needs to be punctured?
I plan on sealing the puncture with silicone glue.
Thanks everyone!
Edited 1 time(s). Last edit at 04/27/2013 02:22AM by boxsterd. (view changes)
So in the last pic with the blue arrow, is that arrow pointing to the rubber boot that needs to be punctured?I plan on sealing the puncture with silicone glue.
Thanks everyone!
Edited 1 time(s). Last edit at 04/27/2013 02:22AM by boxsterd. (view changes)
| Yes, you got it. grant - Saturday, 27 April, 2013, at 9:28:27 am |
| Re: The arrow may help clarify... Chris in Va Beach - Saturday, 27 April, 2013, at 5:06:01 pm |
Yes - you gut it. I'm a critical care doc, so access to a good 20 gauge needle and syringe was easy. Almost too small to force really viscous lithium through, but not quite. I agree with grant that moly would be better (I think I used that on the rear a few years ago).
The unlubricated creaking (dry socket) can't be good. But this isn't a bandaid - it should keep the wear at bay. My back is still fine after 8 years. I have replaced all 4 track arms, but the control arms are original.
The unlubricated creaking (dry socket) can't be good. But this isn't a bandaid - it should keep the wear at bay. My back is still fine after 8 years. I have replaced all 4 track arms, but the control arms are original.
| No need to rig a make-shift syringe. NAPA sells them for exactly this use, adn they attach.. grant - Sunday, 28 April, 2013, at 8:30:46 am |
| Re: No need to rig a make-shift syringe. NAPA sells them for exactly this use, adn they attach.. boxsterd - Sunday, 28 April, 2013, at 6:07:00 pm |
| Making a bit too much out of it.... RainyDayGarage - Monday, 29 April, 2013, at 9:01:53 am |
The rubber boot is just a dust cover...how it is punctured is kind of irrelevant.
Do it with what you have handy.
You can skip all the fuss regarding syringe and needle. We just poke it with a brad and it worked just fine.
Just puncture it large enough to shove the thin plastic straw which usually comes with a can of lithium grease (or whatever lubricant you end up using).
Resealing the hole is also just a suggestion and not a "must do."
Pump in the grease until it starts backing out of the hole.
The whole point is to get the grease to the ball joint...the rubber boot is just in the way of that goal.
| That sounds harder and messier grant - Wednesday, 1 May, 2013, at 9:42:14 am |
| Re: The entire task took about 10 seconds once the tire was removed... RainyDayGarage - Saturday, 4 May, 2013, at 3:33:42 pm |
- Wipe the rubber with a rag
- poked the rubber cover with a pointy brad
- pushed the plastic straw into the hole
- attached the straw to the nozzle of the can of spray grease
- pressed slowly until some grease started to come out of the hole, added a bit more.
Done...elapsed time: about 10 seconds.
Edited 2 time(s). Last edit at 05/04/2013 03:41PM by RainyDayGarage. (view changes)
| Re: The arrow may help clarify... boxsterd - Friday, 3 May, 2013, at 1:25:27 pm |
| Get one of these... Pedro (Odessa, FL) - Friday, 3 May, 2013, at 5:37:55 pm |
[pedrosgarage.com]
Happy Boxstering,
Pedro
Pedro Bonilla
1998 Boxster 986 - 311,000+ miles: [www.PedrosGarage.com]
PCA National Club Racing Scrutineer - PCA National HPDE Instructor - PCA Technical Committee (Boxster/Cayman)
Racecar spelled backwards is Racecar
"Racing is life. Anything before or after is just waiting" ... Steve McQueen as Michael Delaney in "LeMans"
"If you wait, all that happens is that you get older"... Mario Andretti
"Being second is to be the first of the ones who lose" ... Ayrton Senna
| Nope, juts piush it in there. That's also one reason... grant - Saturday, 4 May, 2013, at 5:24:14 pm |
| Re: Nope, juts piush it in there. That's also one reason... boxsterd - Sunday, 5 May, 2013, at 6:01:51 pm |
I bought a 3ml syringe with a 18 gauge needle from my local Walgreens pharmacy for $14, a tube of Moly CV grease for $5 as pictured below. I injected 3ml into the boot. When I went back to put more in I noticed a drop was oozing out so I stopped. I wiped away the drop, put some silicone sealant over the hole. I came back later and another dropped seeped out. Now that I think about it, if the purpose of the boot is to keep dust out, I don't see how anything get in the tiny hole. I'm inclined to take the other poster's advice that sealing the hole is optional.
Today I tried sitting on the rear fender after driving and no squeak! We will see how long it lasts but so far so good.
My next question, what do people think about doing this for the other three control arm boots as a preventive measure? It was super easy, I didn't have to take the tire off, and took about 10 seconds.

| Re: Nope, juts piush it in there. That's also one reason... boxsterd - Wednesday, 8 May, 2013, at 1:01:12 pm |

| Did you force a bunch in with the NAPA syringe? And seal it? grant - Wednesday, 8 May, 2013, at 1:21:56 pm |
| Re: Did you force a bunch in with the NAPA syringe? And seal it? boxsterd - Wednesday, 8 May, 2013, at 3:39:15 pm |
| Hmm, you method looks good, if you got enough in. I used the rig pedro did. grant - Wednesday, 8 May, 2013, at 4:41:22 pm |
I'm sure i put a lot more than 3mL in. a LOT more. remember that it will ooze out locally, even if it has not worked its way into the bearing joint. You may need to massage it in. Mine was more exposed, as you noted earlier these are very hard to get at.
I'm about to re-do my suspension (struts, springs, all wearable bushings, CV boots, align, corner weight) with a track setup and hacve been looking carefully at how i will get those things OUT. Not convenient. I do need to replace the two back arms, as the rubber has deteriorated (the ball joints are fine).
Grant
Grant
gee-lenahan-at-gee-mail-dot-com
Sorry, only registered users may post in this forum.