|
Home
>
Main Forum
>
Topic Do not use anti-seize!... |  |
|
Buying through this link, gets PB a donation. |

Products for your Boxster, Cayman and Carrera. |
 | |
| O2 Sensor Tool? catalogguy - 9 years ago |
I am planning to tackle this project, but have been reading about specialized tools for O2 sensors; they have a cut-out I think for the wire to stay out of the way of the socket driver.
The 101 Projects book says access is easy on a Boxster, and the tool needed is a 22mm wrench (and other cars would need the special deep socket with the slit on the side).
CAN I JUST USE A SIMPLE 22MM WRENCH?
The Pelican site offers this fancy $50 socket which seems the same as that pictured in the book.
http://www.pelicanparts.com/Porsche/catalog/shopcart/TOOL/POR_TOOL_HAZT04_pg32.htm
Pelican also offers this $25 socket on the Boxster O2 sensor page
http://www.pelicanparts.com/cgi-bin/smart/more_info.cgi?pn=PEL-4491B&catalog_description=
A reviewer on Amazon recommends this $20 socket
http://www.amazon.com/Lisle-12390-Oxygen-Sensor-Wrench/dp/B001C6NE40/ref=sr_1_1?s=automotive&ie=UTF8&qid=1407810213&sr=1-1&keywords=12390+Dual+Drive+Oxygen+Sensor+Wrench
And there are myriad others from $8 & up.
If a regular open ended wrench is sufficient, I'd rather not worry about another special tool.
Sorry if this has been covered; I searched but got no result.

| Re: O2 Sensor Tool? Pedro (Odessa, FL) - 9 years ago |
You can use an open wrench to remove an O2 sensor but be warned that it may slip.
Because of the cat's high heat the O2 sensor may be on very tight.
An open wench only makes contact on 4 sides of the hex therefore not the best choice.
All of the solutions on the market are easily copied as a DIY by using a deep socket or a closed hex wrench of the correct size and cutting a slit for the sensor's pigtail.
Happy Boxstering
Pedro
Pedro Bonilla
1998 Boxster 986 - 311,000+ miles: [www.PedrosGarage.com]
PCA National Club Racing Scrutineer - PCA National HPDE Instructor - PCA Technical Committee (Boxster/Cayman)
Racecar spelled backwards is Racecar
"Racing is life. Anything before or after is just waiting" ... Steve McQueen as Michael Delaney in "LeMans"
"If you wait, all that happens is that you get older"... Mario Andretti
"Being second is to be the first of the ones who lose" ... Ayrton Senna
Boxsterra - 9 years ago |
You can try it but you're likely to just make your life harder. Once you strip the nut it's even harder to get off. They can get virtually welded on from years of heat cycles.
You should be able to get a dedicated socket for between $7-15. Harbor Freight sells one for $6.99, for example: [www.harborfreight.com]
There are also many available from Amazon and Ebay.
You should be able to get a dedicated socket for between $7-15. Harbor Freight sells one for $6.99, for example: [www.harborfreight.com]
There are also many available from Amazon and Ebay.
| Welcome to the DIY world. One is always faced with making do with the tools at hand... MarcW - 9 years ago |
or buying the right (or better) tool for what may be a one time use.
My experience was that the right tool was preferable to trying to undo or deal with the mess caused by using the wrong tool.
If you have room you can use a large adjustable wrench one with jaws that are thicker than sensor flats are wide. The spreads the load out across the whole width of the two flats the wrench contacts.
A good large adjustable wrench can be adjusted to fit the sensor nut flats tightly and if it is a good wrench will not have much play. 'course, a good adjustable wrench is rather expensive tool in its own right and most DIYer's I dare say don't own a good adjustable wrench.
What I recall about my O2 sensor R&R was the sensor was not that tight or hard to remove. Where I ran into trouble was getting the connector to unlatch.
But of course, the sensor threads in your case may be frozen. Before you jump ahead, I have to mention you have to be careful about using any liquid wrench like fluids as these can contaminate the new sensors and ruin them.
My two cents (similar to others' grant - 9 years ago |
Get the right tool, even if you buy a cheap version. Having 6 sides holding is vastly better than two.
The worst of all worlds is an adjustable wrench, which spreads ( a 22mm open end at least won't spread, much)
this is a case where Harbor freight, or several amazon/ebay sellers, are a good choice.
Grant
Grant
gee-lenahan-at-gee-mail-dot-com
The worst of all worlds is an adjustable wrench, which spreads ( a 22mm open end at least won't spread, much)
this is a case where Harbor freight, or several amazon/ebay sellers, are a good choice.
Grant
Grant
gee-lenahan-at-gee-mail-dot-com
| Anti Seize catalogguy - 9 years ago |
Thanks all. I am persuaded to get a decent tool for the job.
Most seem to recommend using an anti-seize compound when installing the new sensor. Are they all the same? ie I can just walk into a local auto parts store and pick up whatever is pegged?
It seems preferable to apply the compound directly to the sensor, not the female threads, to avoid contamination upon inserting the sensor. The threads look pretty scant, so I am thinking to use a q tip to apply the compound to the sensor threads to get a precise application.
| Do not use anti-seize!... MarcW - 9 years ago |
Quote
catalogguy
Thanks all. I am persuaded to get a decent tool for the job.
Most seem to recommend using an anti-seize compound when installing the new sensor. Are they all the same? ie I can just walk into a local auto parts store and pick up whatever is pegged?
It seems preferable to apply the compound directly to the sensor, not the female threads, to avoid contamination upon inserting the sensor. The threads look pretty scant, so I am thinking to use a q tip to apply the compound to the sensor threads to get a precise application.
It will foul the sensor and ruin it. None of the workshop manuals call out any thread lube for the sensor threads.
| Re: Do not use anti-seize!... catalogguy - 9 years ago |
OK. Seems easy enough to omit it.
Various articles say something like the following:
"Hot Tip: Use anti-seize compound on the threads of the sensor to make it easier to replace it next time"
http://www.pelicanparts.com/techarticles/Boxster_Tech/19-FUEL-02_Sensor/19-FUEL-02_Sensor.htm
Edited 1 time(s). Last edit at 08/12/2014 06:34PM by catalogguy. (view changes)
| The advice is ill-advised. The sensor heats up and expands and forces the anti-seize... MarcW - 9 years ago |
out and in the heat at the sensor tip the silicon (or aluminum) in the anti-sieze fouls the tip of the sensor and ruins it.
As the writer of the article did note -- correctly based on my experience -- the sensor will come with some thread lube already present, at least a sensor bought through the dealer. Discount sensors may not come with the lube on the threads.
However, 02 sensor safe anti-seize exists I believe. I think it is copper based stuff and contains no silicon.
If you use some use it sparingly. Apply the stuff to the sensor threads. If you apply it to the threads in the manifold as you thread the sensor in it will push the stuff ahead of the sensor and a blob of it will be there to perhaps get on the top when you start the engine. While the stuff may be O2 sensor safe it doesn't mean can slop on the stuff.
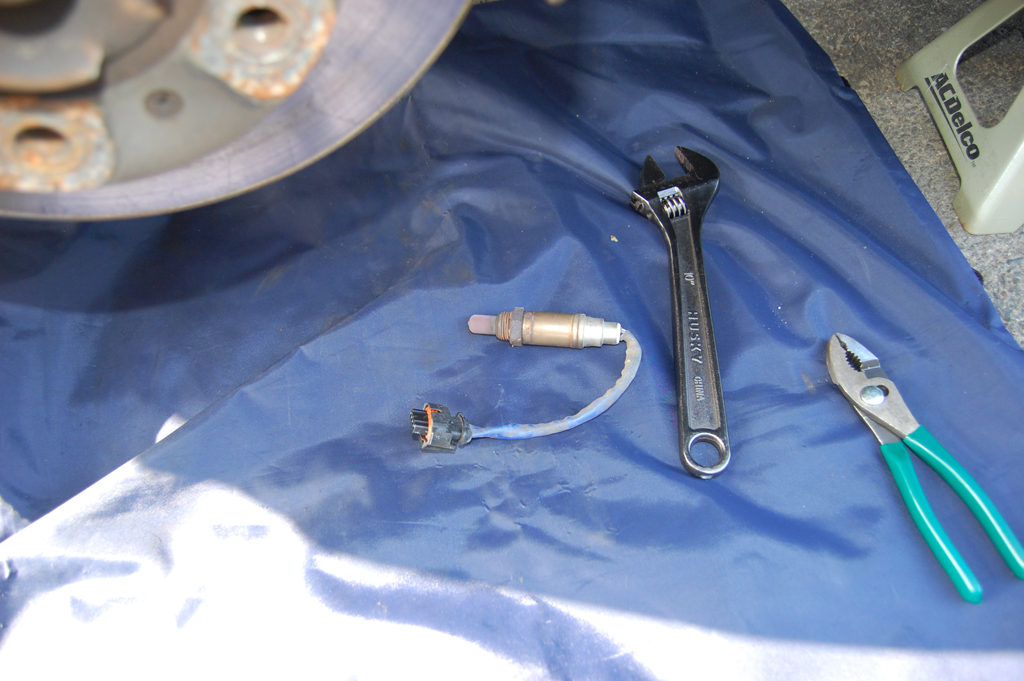
| We installed it just fine without the tool... RainyDayGarage - 9 years ago |
Not a whole lot to the project. Here is a write-up:
[www.rainydaymagazine.com]
Here are the tools we used to remove the 8-yr-old sensor (90K miles driven at the time):
Edited 1 time(s). Last edit at 08/12/2014 04:33PM by RainyDayGarage. (view changes)
[www.rainydaymagazine.com]
Here are the tools we used to remove the 8-yr-old sensor (90K miles driven at the time):

Edited 1 time(s). Last edit at 08/12/2014 04:33PM by RainyDayGarage. (view changes)
| Stupid Question catalogguy - 9 years ago |
With the car up on jack stands, the o2 sensors are a breeze to find. Not so easy is where the rear sensor connects. I took pics and videos of the wire trailing out of the sensor, I couldn't nail it down. It does not seem to be like the photo in the Bentley book.
Could the installation of headers have caused something to be rerouted or reconfigured? I am replacing the rear sensor, and the cat and all look like they are all normal stock equipment.
The front sensor wire connects just above the sensor itself; the connector is easily visible. Is the plug above it the lead from the rear sensor? If so, I do not think the lead on the replacement sensor is nearly long enough to reach it. Here it is in the image below:

This is the rear sensor:

Here the sensor wire disappears:

Edited 1 time(s). Last edit at 08/18/2014 12:41AM by catalogguy. (view changes)
| Edit catalogguy - 9 years ago |
I am studying up on the exhaust systems and think it's possible that the aftermarket headers did away with the quick warming catalytic converters, and the post sensors were removed to another location. The stock location had the post sensors between the 2 converters, and the modification placed the post sensors behind the second converters, the same spot they were installed in the MY 97-99 cars. Probably, the leads on the post sensors were lengthened to allow the new location, and the lead was routed above other components, out of the way.
Sorry, only registered users may post in this forum.