|
Home
>
Main Forum
>
Topic The lights on a Spec Boxster..... |  |
|
Buying through this link, gets PB a donation. |

Products for your Boxster, Cayman and Carrera. |
 | |
| Boxster to Spec progress Trygve (San Francisco, CA) - Friday, 2 September, 2011, at 5:06:33 pm |
Forgive the long post but I hope it's interesting! 
I'm not sure if I'd mentioned it before on Pedro's Board, but I recently started the process of converting my 1998 Boxster to "Spec" racer form. Thought I'd post a progress report and a few photos of the process so far. You may have seen various pictures of my car since the early PPBB days so now you can see some of the details of the all the weight-adding/sound-proofing luxuriating material on the car and what's underneath it. (I have a for sale listing here on PB for all the items I'm pulling off the car and a page with all the details. Recouping the cost of some parts is a good way to trick myself into thinking this really isn't going to cost that much!)
Parts Info
Parts PDF
This my favorite photo so far -- skeleton on the left, guts on the right!

The first area I worked on was the main interior. The floor carpet is a one-piece tub that is held in place by other parts (no glue), so first those other things like door sill trim (trunk levers), center console, shifter and handbrake, gas pedal and fuse box cover, need to come off in order to remove the carpet. This is all pretty simple and quick, and primarily just bolts and screws. An evening's work.

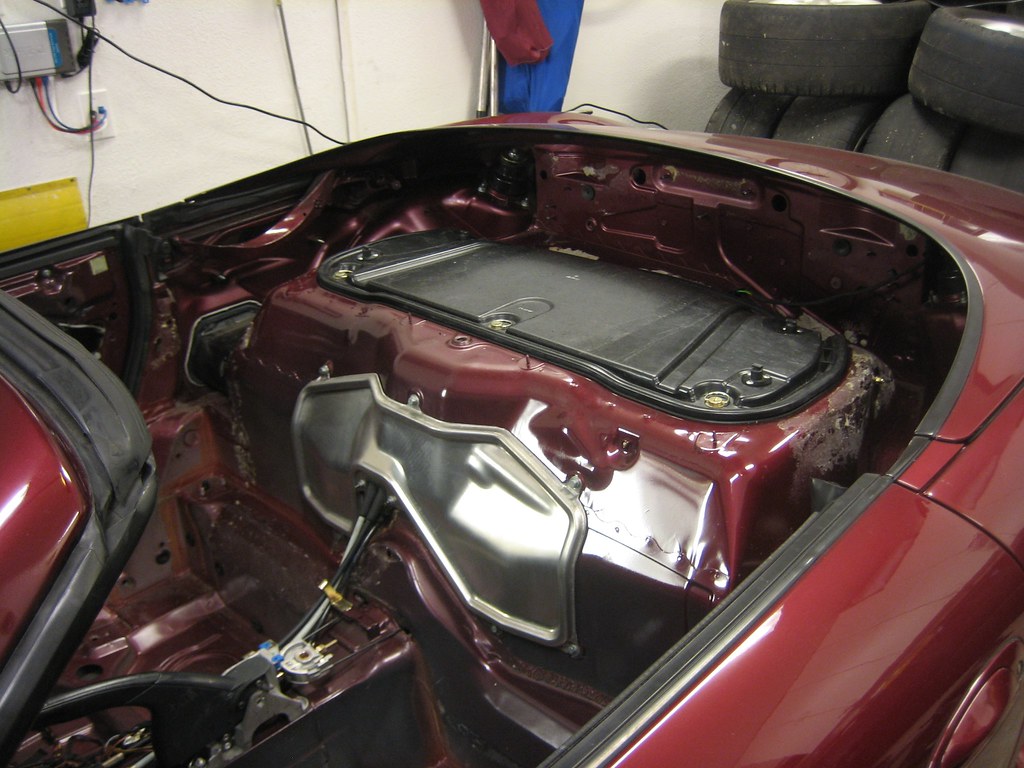
To complete the main interior (not counting the door panels and dash) there's a glued-on carpet strip at the bottom of the firewall behind the seats. Getting the adhesive residue off is a pain and so far denatured alcohol works best (Goo Gone and an Eco bike chain degreaser don't get the job done). The plastic covers near the door sills where the trunk release cables are come off with a few bolts and screws. Normally on a race car external hood pins replace the release cables and latches (weight savings) but until I do that I may want to at least keep the front release cable working (only the rear can be opened with the key fob remote on a '98). Under those panels are the airbag sensors. All airbag wiring seems to have yellow connectors, you can see the two in this photo (air bag connector in door, air bag sensor connector by door sill).

Everthing behind the roll bar was next. I was pleasantly shocked at how simple it was to remove the convertible top. Pop off the two forward arm levers, and then it's just three bolts and two little screws on each side that attach the top to the roll bar. On my own it was possible to lift the top out of the car, though it was awkward and I had to be very careful not to drop it on the outside panel; with two people it would easily be done in a minute.

The rest of the rear compartment just involved undoing fasteners and pulling off the foam padding that is tucked or glued on. The convertible transmissions and motor and cables etc. just require removing all the nuts and bolts in sight. The top cables that plug into the motor pull straight out after sliding off the retaining clips. Unless the roll bar is removed first, a single cut is necessary in the single piece of foam on each side of it. The driver side had an extra piece of white plastic above the top transmission that was mysterious to me at first, but after the rest of the parts came off I found it to be a protective cover channel for the wiring harness, that should probably remain.

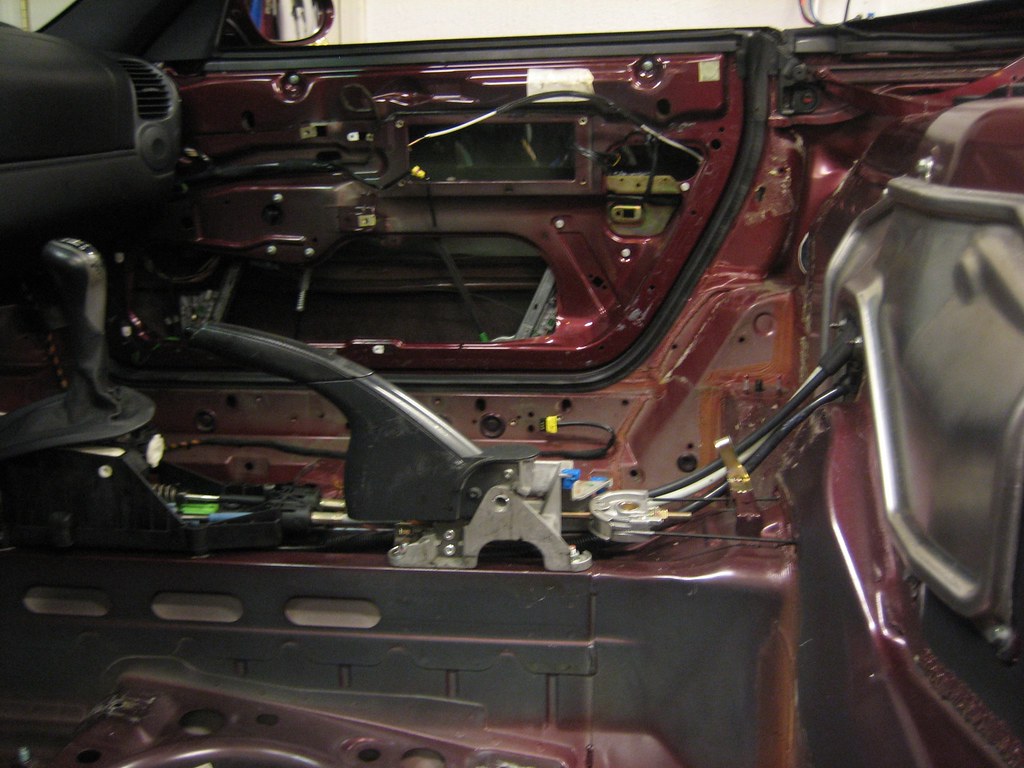
The roll bar was next, and it's easy with just 8 bolts attaching to the frame. The weird thing is that a 1/2-in socket fit better than a 13mm. Finally, I removed the door panels and airbags. The window motors and glass will come out next and the roll cage builder will probably use a plasma cutter to remove the extra door material.
Next up will be the dashboard (unnecessary things behind it) and the trunks (liner carpet and various trim). I'm toying with the idea of finding a way to keep the window glass mounted in the up position but quickly removable, so I can drive "windows up" on longer drives to and from the track while not having the motor and regulator. Once the dash and windows are out, it's ready for the cage! There is a local cage builder here that does a great job on Boxster cages that fit the car as tightly as possible.
Weight loss so far: about 190 lbs. Does not include replacing the 2 factory leather heated seats with my single Sparco race seat on sliders, netting about 60 lbs. more.
I'm not sure if I'd mentioned it before on Pedro's Board, but I recently started the process of converting my 1998 Boxster to "Spec" racer form. Thought I'd post a progress report and a few photos of the process so far. You may have seen various pictures of my car since the early PPBB days so now you can see some of the details of the all the weight-adding/sound-proofing luxuriating material on the car and what's underneath it. (I have a for sale listing here on PB for all the items I'm pulling off the car and a page with all the details. Recouping the cost of some parts is a good way to trick myself into thinking this really isn't going to cost that much!)
Parts Info
Parts PDF
This my favorite photo so far -- skeleton on the left, guts on the right!

The first area I worked on was the main interior. The floor carpet is a one-piece tub that is held in place by other parts (no glue), so first those other things like door sill trim (trunk levers), center console, shifter and handbrake, gas pedal and fuse box cover, need to come off in order to remove the carpet. This is all pretty simple and quick, and primarily just bolts and screws. An evening's work.

To complete the main interior (not counting the door panels and dash) there's a glued-on carpet strip at the bottom of the firewall behind the seats. Getting the adhesive residue off is a pain and so far denatured alcohol works best (Goo Gone and an Eco bike chain degreaser don't get the job done). The plastic covers near the door sills where the trunk release cables are come off with a few bolts and screws. Normally on a race car external hood pins replace the release cables and latches (weight savings) but until I do that I may want to at least keep the front release cable working (only the rear can be opened with the key fob remote on a '98). Under those panels are the airbag sensors. All airbag wiring seems to have yellow connectors, you can see the two in this photo (air bag connector in door, air bag sensor connector by door sill).
Everthing behind the roll bar was next. I was pleasantly shocked at how simple it was to remove the convertible top. Pop off the two forward arm levers, and then it's just three bolts and two little screws on each side that attach the top to the roll bar. On my own it was possible to lift the top out of the car, though it was awkward and I had to be very careful not to drop it on the outside panel; with two people it would easily be done in a minute.
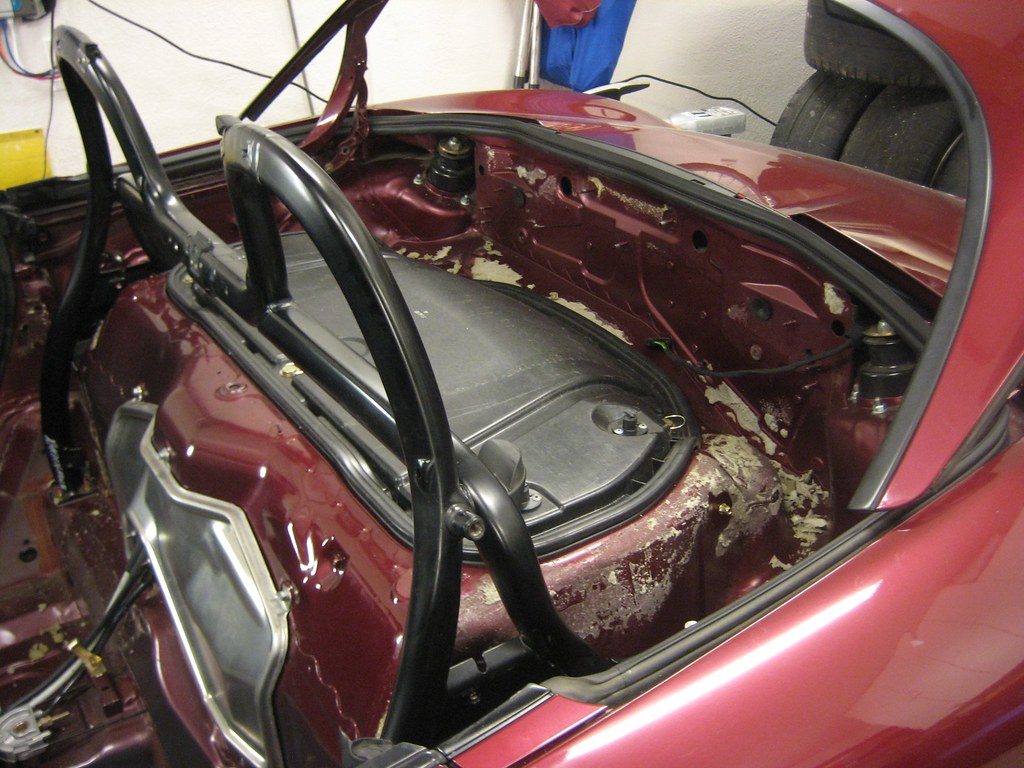
The rest of the rear compartment just involved undoing fasteners and pulling off the foam padding that is tucked or glued on. The convertible transmissions and motor and cables etc. just require removing all the nuts and bolts in sight. The top cables that plug into the motor pull straight out after sliding off the retaining clips. Unless the roll bar is removed first, a single cut is necessary in the single piece of foam on each side of it. The driver side had an extra piece of white plastic above the top transmission that was mysterious to me at first, but after the rest of the parts came off I found it to be a protective cover channel for the wiring harness, that should probably remain.

The roll bar was next, and it's easy with just 8 bolts attaching to the frame. The weird thing is that a 1/2-in socket fit better than a 13mm. Finally, I removed the door panels and airbags. The window motors and glass will come out next and the roll cage builder will probably use a plasma cutter to remove the extra door material.

Next up will be the dashboard (unnecessary things behind it) and the trunks (liner carpet and various trim). I'm toying with the idea of finding a way to keep the window glass mounted in the up position but quickly removable, so I can drive "windows up" on longer drives to and from the track while not having the motor and regulator. Once the dash and windows are out, it's ready for the cage! There is a local cage builder here that does a great job on Boxster cages that fit the car as tightly as possible.
Weight loss so far: about 190 lbs. Does not include replacing the 2 factory leather heated seats with my single Sparco race seat on sliders, netting about 60 lbs. more.

| Re: Boxster to Spec progress Guenter in Ontario - Friday, 2 September, 2011, at 5:59:01 pm |
| Re: Boxster to Spec progress Alcantera - Friday, 2 September, 2011, at 6:03:07 pm |
Time to put Boxster bits on ebay, you should be able to recoup some of your expenses. We have a customer who we call boxsterdoxster that has done the same conversion. Having been around Porsche's a lot lately I think a 944 may be a better choice but The value of these boxsters makes them great candidates for spec racers. We look forward to your posts
| Re: Boxster to Spec progress Trygve (San Francisco, CA) - Saturday, 3 September, 2011, at 4:45:15 pm |
Al, so far it's going pretty good on selling off parts. I have a long time Boxster friend who posts here once in a while, who is buying pretty much all the leather-clad parts to upgrade his non-leather interior for cheap! Other than the 18" wheels, the hard top is the one big ticket item that requires finding the perfect buyer because of the color. It's preferable to use an aftermarket fiberglas shell instead of the factory hard top, because the price is probably slightly less than what the hard top is worth, and it's 40 lbs. lighter, resulting in a lower center of gravity. Also the cage builder says he can get more space with the shell.
This weekend I'm going to see how difficult the dashboard is. Studying the wiring harness will be interesting, I'm sure. The passenger side has a whole length of now-unused wires sitting there in the seat pan. I read one description where the alarm control unit and the fuse panel were relocated to where the passenger side airbag currently lives behind the dash. That sounds like an awesome idea but I don't know how deep into wiring harness surgery that requires.
This weekend I'm going to see how difficult the dashboard is. Studying the wiring harness will be interesting, I'm sure. The passenger side has a whole length of now-unused wires sitting there in the seat pan. I read one description where the alarm control unit and the fuse panel were relocated to where the passenger side airbag currently lives behind the dash. That sounds like an awesome idea but I don't know how deep into wiring harness surgery that requires.
| Re: Boxster to Spec progress Alcantera - Sunday, 4 September, 2011, at 7:40:20 pm |
Your headlights should sell fast,we get calls for them weekly. you should be able to find some lights with burns or broken adjusters to take the lenses off. put your inflate a spare and jack and tool kit on ebay, guys that live in remote areas will pay for them if they don't have a spare. We sold a set last week to a guy who lives in northern Alberta.
| The lights on a Spec Boxster..... Pedro (Odessa, FL) - Monday, 5 September, 2011, at 7:34:10 am |
.... Need to remain for two reasons.
The car will be kept street legal and there are a lot of night races now which are a lot of fun.
Happy Boxstering,
Pedro
Pedro Bonilla
1998 Boxster 986 - 311,000+ miles: [www.PedrosGarage.com]
PCA National Club Racing Scrutineer - PCA National HPDE Instructor - PCA Technical Committee (Boxster/Cayman)
Racecar spelled backwards is Racecar
"Racing is life. Anything before or after is just waiting" ... Steve McQueen as Michael Delaney in "LeMans"
"If you wait, all that happens is that you get older"... Mario Andretti
"Being second is to be the first of the ones who lose" ... Ayrton Senna
| Re: The lights on a Spec Boxster..... Trygve (San Francisco, CA) - Monday, 5 September, 2011, at 3:45:37 pm |
I agree, Pedro. And more importantly, the rules state:
"15.3.3 All headlights and taillights must remain stock. Headlights may be covered."
I got most of the dashboard preliminaries done yesterday, it should come right out today. More photos soon!
The only thing I had to "ruin" so far was the rubbery shroud around the back of the original 4-spoke steering wheel. The holes in it that provide access to the bolts for removing the airbag are not only a little too small to fit my torx screwdriver into, but it was impossible to find purchase on one bolt so I gave up and cut into it. The wheel grip was pretty worn out anyway.
Harvey in FL - Monday, 5 September, 2011, at 6:03:39 pm |
shame you have started and are located on the west coast. From the comments of fellow racers, it's a great buy.
[forums.rennlist.com]
Well. I guess it's more fun to start from scratch and do it your way. Good luck and can't wait to see more pics.
[forums.rennlist.com]
Well. I guess it's more fun to start from scratch and do it your way. Good luck and can't wait to see more pics.
| that's a nice car Trygve (San Francisco, CA) - Tuesday, 6 September, 2011, at 3:18:28 am |
That's Tim Costa's spec car, and it is definitely in the right color.  Very nice looking build.
But I already had some spec parts on my car (suspension, radiator) that affected the cost considerations a lot. I am having fun working on it, too, though it is tiring fun!
Here's how I started and ended this weekend's work: (windows, steering wheel, dashboard)


Full set here: Phase 4 of interior
Very nice looking build.But I already had some spec parts on my car (suspension, radiator) that affected the cost considerations a lot. I am having fun working on it, too, though it is tiring fun!
Here's how I started and ended this weekend's work: (windows, steering wheel, dashboard)

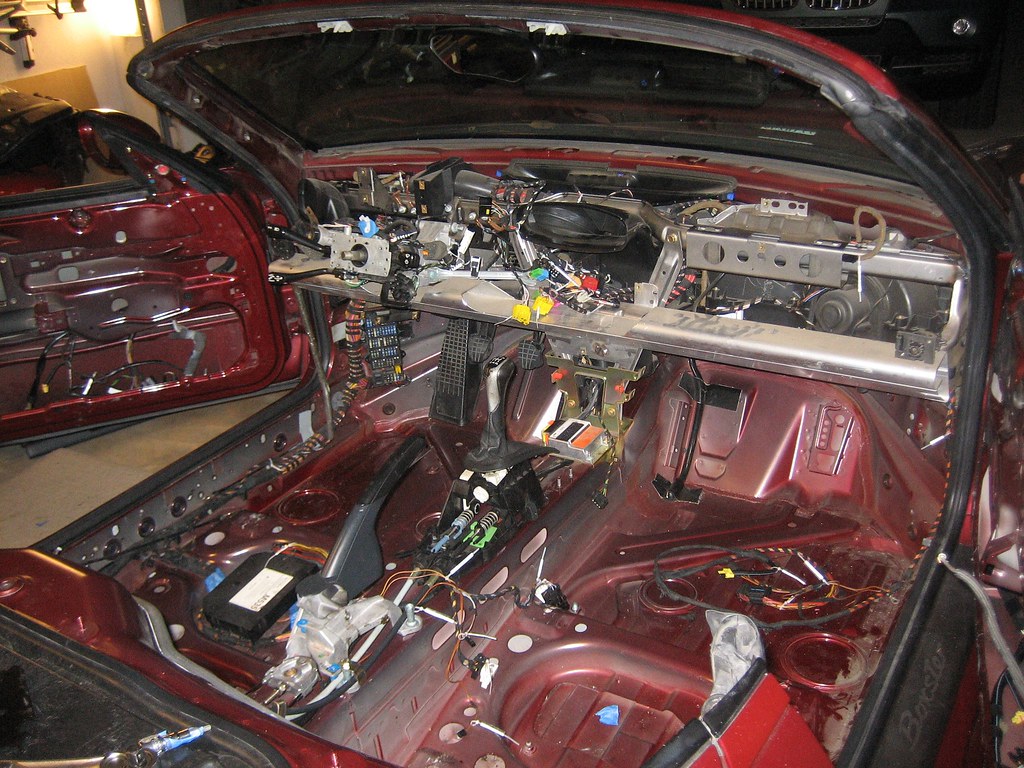
Full set here: Phase 4 of interior
Sorry, only registered users may post in this forum.